本章将介绍如何将 FD.io VPP 与虚拟机一起使用。我们描述如何使用 VPP 创建 Vhost 端口以及如何将它们连接到 VPP。我们还将讨论 Vhost 的一些限制。这里默认已经安装好了可以配置的VPP。
拓扑
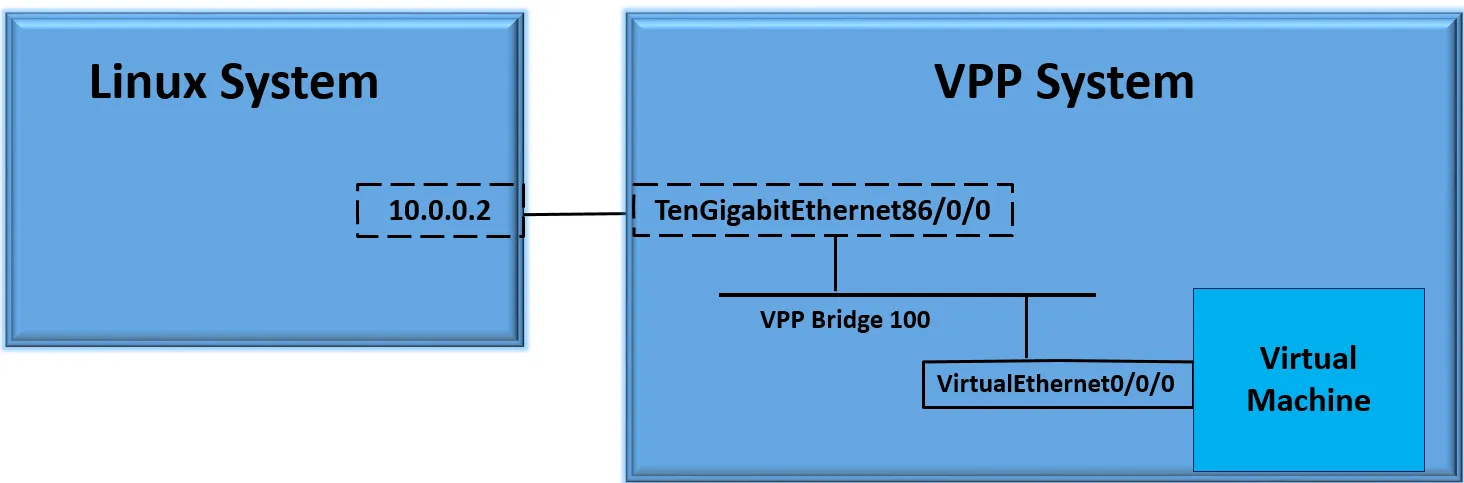
创建虚拟接口
注意,现在没有任何虚拟接口。我们只用一个已启动的物理接口。该物理接口连接到正在运行的另一个linux系统。我们将使用该系统通过 ping 验证与虚拟机的连接。
jkx@duck:~/vpp$ make run
perfmon               [warn  ]: skipping source 'intel-uncore' - intel_uncore_init: no uncore units found
vat-plug/load         [error ]: vat_plugin_register: oddbuf plugin not loaded...
vat-plug/load         [error ]: vat_plugin_register: idpf plugin not loaded...
    _______    _        _   _____  ___
 __/ __/ _ \  (_)__    | | / / _ \/ _ \
 _/ _// // / / / _ \   | |/ / ___/ ___/
 /_/ /____(_)_/\___/   |___/_/  /_/

DBGvpp#
DBGvpp# sh int
              Name               Idx    State  MTU (L3/IP4/IP6/MPLS)     Counter          Count
eth1                              1     down         9000/0/0/0
eth2                              2     down         9000/0/0/0
eth3                              3     down         9000/0/0/0
eth4                              4     down         9000/0/0/0
local0                            0     down          0/0/0/0
接下来使用 create vhost user 命令创建虚拟端口。此命令将在 VPP 中创建虚拟端口,创建 VM 将用于连接到 VPP 的 Linux 套接字。可以使用 VPP 作为套接字服务器或客户端来创建端口。
创建 VPP 端口:
DBGvpp# create vhost socket /tmp/vm00.sock
VirtualEthernet0/0/0
DBGvpp# sh int
              Name               Idx    State  MTU (L3/IP4/IP6/MPLS)     Counter          Count
VirtualEthernet0/0/0              5     down         9000/0/0/0
eth1                              1     down         9000/0/0/0
eth2                              2     down         9000/0/0/0
eth3                              3     down         9000/0/0/0
eth4                              4     down         9000/0/0/0
local0                            0     down          0/0/0/0
DBGvpp#
在此示例中,我们创建虚拟接口作为客户端。我们可以使用 show vhost 命令获取有关虚拟主机连接的更多详细信息。
DBGvpp# sh vhost
Virtio vhost-user interfaces
Global:
  coalesce frames 32 time 5e-1
  Number of rx virtqueues in interrupt mode: 0
  Number of GSO interfaces: 0
  Thread 0: Polling queue count 0
  Thread 1: Polling queue count 1
Interface: VirtualEthernet0/0/0 (ifindex 5)
  Number of qids 2
virtio_net_hdr_sz 0
 features mask (0xfffffffbdfffa27c):
 features (0x0):
  protocol features (0x0)

 socket filename /tmp/vm00.sock type client errno "No such file or directory"

 rx placement:
   thread 1 on vring 1, polling
 tx placement

 Memory regions (total 0)
注意 “No such file or directory”。这是因为虚拟机尚未创建。
创建虚拟机
使用xml文件来创建虚拟机(xml文件见附件)
-
小提示
针对 VPP + KVM (vhost-user) 实验,建议选择以下这个镜像:
核心推荐
jammy-server-cloudimg-amd64-disk-kvm.img
下载后怎么放?
-
下载位置: 推荐放在
/var/lib/libvirt/images/,这是libvirt的默认路径。Bash# 下载镜像 sudo wget https://cloud-images.ubuntu.com/jammy/current/jammy-server-cloudimg-amd64-disk-kvm.img -P /var/lib/libvirt/images/ -
重命名(可选): 为了方便管理,可以改个短一点的名字:Bash
sudo mv /var/lib/libvirt/images/jammy-server-cloudimg-amd64-disk-kvm.img /var/lib/libvirt/images/ubuntu22-vpp.qcow2
设置登录密码
Cloud Image 默认是没有密码且禁止 root 登录的。如果你不处理,虚拟机启动后你进不去。
使用
virt-customize在宿主机上直接给镜像设置密码:
Bash
# 安装工具 sudo apt-get install libguestfs-tools //设置 root 密码为 '123456' (测试用) sudo virt-customize -a /var/lib/libvirt/images/ubuntu22-vpp.qcow2 --root-password password:123456
XML 最终检查清单
在的 XML 文件 中,请确保:
-
磁盘路径:
<source file='/var/lib/libvirt/images/ubuntu22-vpp.qcow2' /> -
磁盘格式:
<driver name='qemu' type='qcow2' /> -
网卡路径:
<source type='unix' path='/tmp/vm00.sock' mode='server' />(确保/tmp/目录 libvirt 有权访问)。
-
jkx@duck:~$ virsh create ./iperf3-vm.xml
Domain 'iperf-server' created from ./iperf3-vm.xml

jkx@duck:~$ virsh list
 Id   Name           State
------------------------------
 1    iperf-server   running
在虚拟机成功创建并运行之后,你可以通过 virsh dumpxml 命令,反向导出该虚拟机当前完整的 XML 配置文件。
jkx@duck:~$ # 将屏幕上显示的配置信息保存为一个新的文件备份
virsh dumpxml iperf-server > backup-iperf.xml
用 virsh create my-vm.xml 启动了虚拟机,这个虚拟机是“瞬时”的(关机即消失)。如果你想把它变成“持久”的,就需要把 dumpxml 导出的内容保存下来。
创建虚拟机后,请注意套接字文件名显示成功并且存在内存区域。此时VM和FD.io VPP已连接。另请注意 qsz 1024。256 的队列大小将影响虚拟主机吞吐量。 qsz 应为 1024。在 QEMU 2.10.0 和 libvirt 3.7.0 及更高版本中,这是在 xml 文件中使用上面和示例中显示的行
jkx@duck:/tmp$ ls -la
total 84
drwxrwxrwt 19 root         root 4096 Apr 17 14:48 .
drwxr-xr-x 23 root         root 4096 Feb  6 17:02 ..
srwxrwxr-x  1 libvirt-qemu kvm     0 Apr 17 14:33 vm00.sock
DBGvpp# sh vhost
Virtio vhost-user interfaces
Global:
  coalesce frames 32 time 5e-1
  Number of rx virtqueues in interrupt mode: 0
  Number of GSO interfaces: 0
  Thread 0: Polling queue count 0
  Thread 1: Polling queue count 1
Interface: VirtualEthernet0/0/0 (ifindex 5)
  Number of qids 2
virtio_net_hdr_sz 12
 features mask (0xfffffffbdfffa27c):
 features (0x150208000):
   VIRTIO_NET_F_MRG_RXBUF (15)
   VIRTIO_NET_F_GUEST_ANNOUNCE (21)
   VIRTIO_RING_F_INDIRECT_DESC (28)
   VHOST_USER_F_PROTOCOL_FEATURES (30)
   VIRTIO_F_VERSION_1 (32)
  protocol features (0x3)
   VHOST_USER_PROTOCOL_F_MQ (0)
   VHOST_USER_PROTOCOL_F_LOG_SHMFD (1)

 socket filename /tmp/vm00.sock type client errno "Success"

 rx placement:
   thread 1 on vring 1, polling
 tx placement
   threads 0-1 on vring 0: spin-lock

 Memory regions (total 1)
 region fd    guest_phys_addr    memory_size        userspace_addr     mmap_offset        mmap_addr
 ====== ===== ================== ================== ================== ================== ==================
  0     43    0x0000000000000000 0x0000000040000000 0x000077e580000000 0x0000000000000000 0x0000746600000000

 Virtqueue 0 (TX)
  global TX queue index 8
  qsz 1024 last_avail_idx 0 last_used_idx 0 last_kick 0
  avail.flags 0 avail event idx 0 avail.idx 0 used.flags 1 used event idx 0 used.idx 0
  kickfd 44 callfd 45 errfd 40

 Virtqueue 1 (RX)
  global RX queue index 4
  qsz 1024 last_avail_idx 0 last_used_idx 0 last_kick 0
  avail.flags 0 avail event idx 0 avail.idx 0 used.flags 1 used event idx 0 used.idx 0
  kickfd 39 callfd 46 errfd 42
桥接接口
将两接口(连接外部linux的eth1接口、刚刚创建的vhost接口)桥接到二层桥上面
DBGvpp# sh int
              Name               Idx    State  MTU (L3/IP4/IP6/MPLS)     Counter          Count
VirtualEthernet0/0/0              5     down         9000/0/0/0
eth1                              1     down         9000/0/0/0
eth2                              2     down         9000/0/0/0
eth3                              3     down         9000/0/0/0
eth4                              4     down         9000/0/0/0
local0                            0     down          0/0/0/0
DBGvpp# set interface l2 bridge VirtualEthernet0/0/0 100
DBGvpp# set interface l2 bridge eth1 100
DBGvpp# sh bridge-domain
  BD-ID   Index   BSN  Age(min)  Learning  U-Forwrd   UU-Flood   Flooding  ARP-Term  arp-ufwd Learn-co Learn-li   BVI-Intf
   100      1      0     off        on        on       flood        on       off       off        0    16777216     N/A

DBGvpp# sh bridge-domain 100 detail
  BD-ID   Index   BSN  Age(min)  Learning  U-Forwrd   UU-Flood   Flooding  ARP-Term  arp-ufwd Learn-co Learn-li   BVI-Intf
   100      1      0     off        on        on       flood        on       off       off        0    16777216     N/A
span-l2-input l2-input-classify l2-input-feat-arc l2-policer-classify l2-input-acl vpath-input-l2 l2-ip-qos-record l2-input-vtr l2-learn l2-rw l2-fwd l2-flood l2-flood l2-output

           Interface           If-idx ISN  SHG  BVI  TxFlood        VLAN-Tag-Rewrite
     VirtualEthernet0/0/0        5     1    0    -      *                 none
             eth1                1     1    0    -      *                 none
DBGvpp#
启动并配置IP
启动vpp上桥接的接口:
DBGvpp# set interface state VirtualEthernet0/0/0 up
DBGvpp# set interface state eth1 up
DBGvpp# sh int
              Name               Idx    State  MTU (L3/IP4/IP6/MPLS)     Counter          Count
VirtualEthernet0/0/0              5      up          9000/0/0/0
eth1                              1      up          9000/0/0/0
配置虚拟机和外部linux的接口地址
duck内部的虚拟机:
jkx@duck:/tmp$ virsh console iperf-server
Connected to domain 'iperf-server'
Escape character is ^] (Ctrl + ])

root@ubuntu:~# ip a
---
2: enp1s0: <BROADCAST,MULTICAST> mtu 1500 qdisc noop state DOWN group default qlen 1000
    link/ether 52:54:00:4c:47:f2 brd ff:ff:ff:ff:ff:ff
root@ubuntu:~# sudo ip addr add 192.168.150.10/24 dev enp1s0
root@ubuntu:~# sudo ip link set enp1s0 up
root@ubuntu:~# ip a
---
2: enp1s0: <BROADCAST,MULTICAST,UP,LOWER_UP> mtu 1500 qdisc pfifo_fast state UP group default qlen 1000
    link/ether 52:54:00:4c:47:f2 brd ff:ff:ff:ff:ff:ff
    inet 192.168.150.10/24 scope global enp1s0
       valid_lft forever preferred_lft forever
    inet6 fe80::5054:ff:fe4c:47f2/64 scope link
       valid_lft forever preferred_lft forever
外部的linux主机
(base) test@test-Default-string:~$ sudo ip addr add 192.168.150.15/24 dev enp6s0
(base) test@test-Default-string:~$ sudo ip link set enp6s0 up
(base) test@test-Default-string:~$ ifconfig
enp6s0: flags=4099<UP,BROADCAST,MULTICAST>  mtu 1500
        inet 192.168.150.15  netmask 255.255.255.0  broadcast 0.0.0.0
        ether 88:06:5b:50:ac:d3  txqueuelen 1000  (Ethernet)
        RX packets 0  bytes 0 (0.0 B)
        RX errors 0  dropped 0  overruns 0  frame 0
        TX packets 0  bytes 0 (0.0 B)
        TX errors 0  dropped 0 overruns 0  carrier 0  collisions 0
        device memory 0xb1100000-b11fffff
外部linux ping内部虚拟机
远程 Linux 系统的 IP 地址为“192.168.150.15”,我们现在可以从虚拟机访问它。 使用“virsh console”命令连接到虚拟机。 “ctrl-]”退出。
root@ubuntu:~# ping 192.168.150.15
PING 192.168.150.15 (192.168.150.15) 56(84) bytes of data.
64 bytes from 192.168.150.15: icmp_seq=1 ttl=64 time=1.69 ms
64 bytes from 192.168.150.15: icmp_seq=2 ttl=64 time=0.418 ms
64 bytes from 192.168.150.15: icmp_seq=3 ttl=64 time=0.428 ms
64 bytes from 192.168.150.15: icmp_seq=4 ttl=64 time=0.427 ms
64 bytes from 192.168.150.15: icmp_seq=5 ttl=64 time=0.414 ms
在 VPP 上,现在可以看到数据包计数在增加。来自虚拟机的数据包在 VirtualEthernet0/0/0 上被视为接收数据包,然后桥接到eth1,并被视为作为发送数据包离开系统。在进来的路上情况正好相反。
DBGvpp# sh int
              Name               Idx    State  MTU (L3/IP4/IP6/MPLS)     Counter          Count
VirtualEthernet0/0/0              5      up          9000/0/0/0     rx packets                   167
                                                                    rx bytes                   15650
                                                                    tx packets                   209
                                                                    tx bytes                   24508
                                                                    drops                         11
eth1                              1      up          9000/0/0/0     rx packets                   209
                                                                    rx bytes                   24508
                                                                    tx packets                   156
                                                                    tx bytes                   14784
                                                                    tx-error                      11
删除虚拟机
关闭、启动虚机
virsh shutdown iperf-server
virsh start iperf-server
删除虚机
jkx@duck:~$ virsh list
 Id   Name           State
------------------------------
 1    iperf-server   running
virsh destroy iperf-server
删除vhost接口
vpp# delete vhost-user VirtualEthernet0/0/0
sh int
重启查看
vhost接口限制
1. 性能天花板 (Performance)
下面测试链接明确给出了一个性能基准,让你对 vHost 的吞吐量有一个心理预期:
- 极限数据: 在 VPP 18.04 的 CSIT 性能测试 中,使用 2 个线程、2 个核心 以及 1024 的队列深度,最高吞吐量大约是 7.5 Mpps (每秒百万包)。
- 瓶颈所在: 这个限制主要来自于 QEMU vHost 驱动 本身,而不是 VPP 内部的处理能力。如果你发现性能上不去,很可能已经触到了这个驱动层的物理上限。
2. 模式限制:只能当“设备” (Device Mode Only)
技术细节:
- VPP 角色: VPP 在 vHost 交互中只实现了 Device Mode (设备模式)。
- 搭配方案: 它必须配合实现 Driver Mode (驱动模式) 的程序(如 QEMU)来使用。
- 换句话说: 你不能让两个 VPP 直接通过 vHost 互连(因为它们都是设备模式),如果需要 VPP 对 VPP 的高性能互连,你应该改用之前提到的 libmemif。
3. 不支持的功能 (Unsupported Features)
这里列出了三个在普通物理网卡上常见、但在 VPP vHost 中缺失的功能:
- 不支持校验和卸载 (No Checksum Offload): VPP 不会帮你计算或验证包的 Checksum,这部分计算会消耗一部分 CPU 资源。
- 不支持分段卸载 (No TSO - Transmit Segmentation Offload): 大包分片的工作不能交给这个虚拟接口完成。
- 不支持接收过滤 (No Packet Receive Filtering): 它无法像高级网卡那样在硬件(或底层驱动)层面根据规则过滤掉不需要的包,所有的包都会一股脑丢给 VPP 处理。
**一句话总结:**vHost 虽然好用,但它是为了兼容虚拟机而存在的,在性能和功能完备性上相比原生 DPDK 或 memif 都有所牺牲。
遇到的小问题
大页分配的问题给虚拟机宿主机duck分配了2个1G大小的大页,但是虚拟机中无可用的大页导致无法创建虚机。给duck新增一个大页解决问题。
jkx@duck:~$ virsh create ./iperf3-vm.xml
error: Failed to create domain from ./iperf3-vm.xml
error: internal error: QEMU unexpectedly closed the monitor (vm='iperf-server'): 2026-04-17T03:57:00.703959Z kvm: -chardev socket,id=charnet0,path=/tmp/vm00.sock,server=on: info: QEMU waiting for connection on: disconnected:unix:/tmp/vm00.sock,server=on
2026-04-17T03:57:03.134555Z kvm: unable to map backing store for guest RAM: Cannot allocate memory-
大页配置
修改 GRUB 参数
1GB 的大页最可靠的分配方式是在系统启动时预留。这样在内存还没被碎片化之前,内核就会强行划走 3GB。
-
编辑 GRUB 配置文件:Bash
sudo vim /etc/default/grub -
找到
GRUB_CMDLINE_LINUX_DEFAULT这一行,在引号内添加大页参数(保持原有的参数如quiet splash不变):PlaintextGRUB_CMDLINE_LINUX_DEFAULT="... default_hugepagesz=1G hugepagesz=1G hugepages=3" -
更新 GRUB 并重启:Bash
sudo update-grub sudo reboot -
重启后验证: 重启后直接执行
grep Huge /proc/meminfo,你会发现HugePages_Total肯定是 3 了。
-
附录
jkx@duck:~$ cat iperf3-vm.xml
<domain type='kvm'>
  <name>iperf-server</name>
  <memory unit='KiB'>1048576</memory>
  <currentMemory unit='KiB'>1048576</currentMemory>
  <memoryBacking>
    <hugepages>
      <page size='1048576' unit='KiB'/>
    </hugepages>
  </memoryBacking>
  <vcpu placement='static'>1</vcpu>
  <os>
    <type arch='x86_64' machine='q35'>hvm</type>
    <boot dev='hd'/>
  </os>
  <features>
    <acpi/>
    <apic/>
  </features>
  <cpu mode='host-model'>
    <model fallback='allow'></model>
    <numa>
      <cell id='0' cpus='0' memory='1048576' unit='KiB' memAccess='shared'/>
    </numa>
  </cpu>
  <clock offset='utc'>
    <timer name='rtc' tickpolicy='catchup'/>
    <timer name='pit' tickpolicy='delay'/>
    <timer name='hpet' present='no'/>
  </clock>
  <on_poweroff>destroy</on_poweroff>
  <on_reboot>restart</on_reboot>
  <on_crash>restart</on_crash>
  <pm>
    <suspend-to-mem enabled='no'/>
    <suspend-to-disk enabled='no'/>
  </pm>
  <devices>
    <emulator>/usr/bin/kvm</emulator>

    <disk type='file' device='disk'>
      <driver name='qemu' type='qcow2'/>
      <source file='/var/lib/libvirt/images/ubuntu22-vpp.img'/>
      <target dev='vda' bus='virtio'/>
    </disk>

    <controller type='pci' index='0' model='pcie-root'/>

    <controller type='usb' index='0' model='qemu-xhci'/>

    <controller type='virtio-serial' index='0'/>

    <interface type='vhostuser'>
      <mac address='52:54:00:4c:47:f2'/>
      <source type='unix' path='/tmp/vm00.sock' mode='server'/>
      <model type='virtio'/>
      <driver rx_queue_size='1024' tx_queue_size='1024'/>
    </interface>

    <serial type='pty'>
      <target port='0'/>
    </serial>
    <console type='pty'>
      <target type='serial' port='0'/>
    </console>

    <input type='mouse' bus='ps2'/>
    <input type='keyboard' bus='ps2'/>

    <graphics type='vnc' port='-1' autoport='yes' listen='127.0.0.1'>
      <listen type='address' address='127.0.0.1'/>
    </graphics>

    <memballoon model='virtio'/>
  </devices>
</domain>